WooCommerce
To show models in WooCommerce, enable Woocommerce options first from 3D Viewer > Settings > Woocommerce Settings.

Add Models
After enabling, go to the product edit page, there will be a settings panel called 3D Viewer Settings.
From here, add one or more 3D models to show on the product page. Also, set the position of the models and the custom angle.

Configure
For the configuration of WooCommerce models, again go to 3D Viewer > Settings > Woocommerce Settings.
Enable/disable Moving Controls, Zoom, Auto Rotate, Autoplay, set Shadow Intencity, Loading Type(Auto, Lazy, Eager), Auto Rotate Speed, Auto Rotate Delay, and show/hide Progressbar, Fullscreen Button.

WooCommerce- Variant
There are two steps to add different models for different variants of a product: Add Variant, and Set Model for Different Variant
1. Add Variant
To add variants of a product,
- Select the Variable product from the Product data.
- Select Attributes.
- Add new or edit existing attributes. Note: the first attribute will be the selected variant
- Add attribute value.
- Must check the Use of variations option.
- Finally, save attributes.

3D Viewer- WooCommerce Variant- Attributes
After saving attributes, select Variations. Then click Generate Variations.

3D Viewer- WooCommerce Variant- Generate Variations
After clicking Generate Variations, you will see it will show the variations. You can edit the variation. Make sure the price for the variation is added.

3D Viewer- WooCommerce Variant- Variations
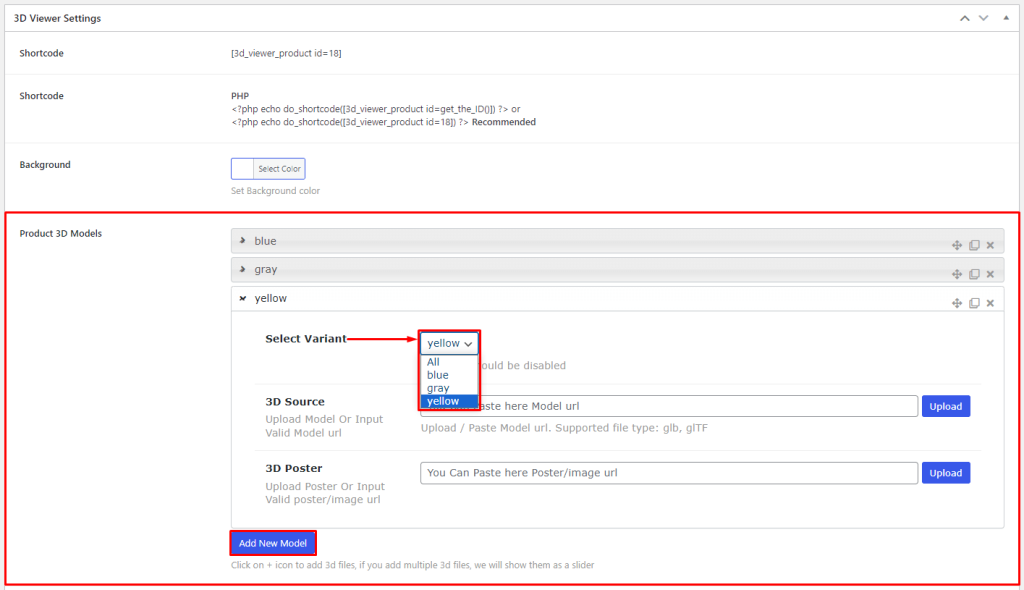
2. Set Model for Different Variants
After adding variations, go to 3D Viewer Settings. From this panel, click on Add New Model from the Product 3D Models option. You can see the option called Select Variant. Add different models from there.
3D Viewer- WooCommerce Variant- Set Model